Structural Installation Tips

Click Here to Download Installation Guide
Shoe Plates
- Shoe plates should be sized based on the thickness of your panels
- Kiln dried SPF is typically used
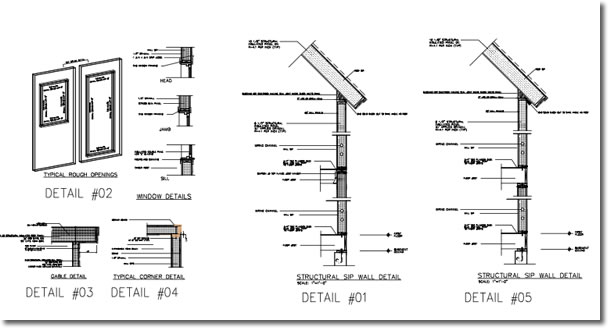
- Gable panels always run by the eave panels. Make sure to leave a 5/8″ gap between the gable plate and eave plate for the inside facing of the SIP (See Detail #04)
- A bead of construction glue should be applied to the floor deck before the shoe plate is set into place
Wall Panel Installation
- A bead of foam should be applied to the shoe plate before the panel is set
- Always start at a corner for wall panel installation
- Corner panels should have the inside facing notched where the wire channels are located
- 8d galvanized ring shank nails should be used to fasten all 2x lumber to panel facings
- A panel nailer should be installed at all corners to fasten the two panels together (See Detail #04)
- All corners should be fastened together using SIP screws at 8″ on center
- Wall panels should be square cut on top with a double top plate
- Reference yourdrawings for details (See Detail #01)
- On structural applications you will spline as you go. This means putting in splines as you join the panels together
- Do not foam your wall panels until all electrical work is complete and all window and door openings are cut and have in lays installed
Window and Door Cut Outs
- Use the provided Prazi beam cutter to cut your window and door openings
- Lay out the openings on the erected panels and chalk lines
- Once the opening is cut use your hot knife to rout out 1 5/8″ of foam around the whole opening (See Detail #02)
- Apply a bead of foam before installing 2x inlays in the openings
- Gently tap the 2x’s in place
- Concussion will collapse the expandable foam
Roof Panel Installation
- Any cuts necessary to accomplish eave and rake details should be made to the panel before it is installed
- This includes routing for sub fascia
- Start on a gable end with your installation. Make sure your overhang is correct on both your eave and rake
- Gable and eave panels should be set in construction adhesive. Make sure your SIPS are supported on both ends of the panel
- One end will rest on your wall
- The other should be resting on a ridge beam or purlin
- Roof panels should be gapped slightly and splined
- Your peak panels will be ripped on a bevel. Make sure to leave a 3/8″ gap at the ridge for foaming
- Roof Panels should be foamed immediately after installation is complete
Roof Foaming
- Drill holes every 6″-8″ if necessary
- Start at the top and foam your way to the bottom
- If it is 40 degrees or less outside we recommend water misting the foam as it is applied
- This will ensure proper expansion
Wall Foaming
- Wall foaming should not be done until all electrical work is complete
- All window and door cuts out should be done with inlays applied
- Chalk lines on the outside of the building where the electrical chases are
- This is done so that you do not drill into the wiring
- Drill holes every 8″ at your panel joints from the outside of the building
- Attach a piece of tape to the drill bit to set the proper depth to reach the foam channel
- Start foaming from the top and work your way down. 3-4 seconds per hole usually works or until you can see foam at the next hole
- If it is 40 degrees or less outside we recommend water misting the foam as it is applied. This will ensure proper expansion
Timber Frame Installation Tips

Click Here to Download Installation Guide
Shoe Plates
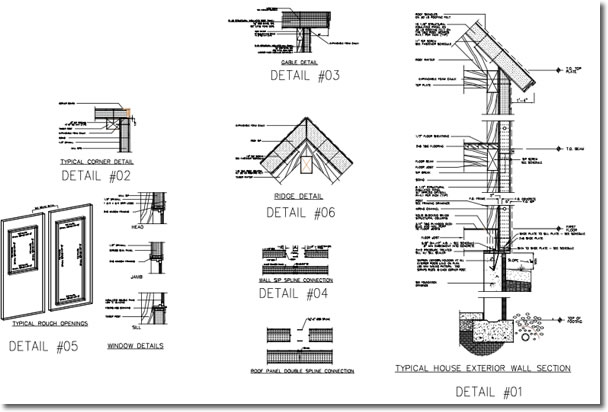
- Shoe plates should be sized based on the thickness of your panels. Kiln dried SPF is typically used. (See Detail #01)
- Gable panels always run by the eave panels. Gable shoe plates should be run by eave shoe plates. Make sure to leave a 5/8″ gap between the gable plate and eave plate for the inside facing of the SIP. (See Detail #02)
- A bead of construction glue should be applied to the floor deck before the shoe plate is set into place.
Wall Panel Installation
- A bead of foam should be applied to the shoe plate before the panel is set.
- First floor wall panels should be cut 3″ below the top of the second floor plate.
(See Detail #01) - Always start at a corner for wall panel installation.
- A 1⁄2″ gap should be left at all corners for foaming. (See Detail #02)
- Corner panels should have the inside facing notched where the wire channels are located.
- Panels should be nailed or screwed 8″ on center where ever a panel comes into contact with any member of your frame other than knee braces. (See Connection Schedule)
- 8d galvanized ring shank nails should be used to fasten all 2x lumber to panel facings. (See Connection Schedule)
- A panel nailer should be installed at all inside corners to fasten the two panels together.
- Gable wall panels should be cut flush with the top of the timber frame if you have boards or sheetrock as an interior finish. This will ensure that there will be a gap between the wall and roof panel for foaming. (See Detail #03)
- Once all your wall panels are on you will drop your splines in from the top. Make sure to do this before you roof panels are applied. Use 8d galvanized ring shank nails to nail your splines. (See Detail #04)
- Do not foam your wall panels until all electrical work is complete and all window and door openings are cut and have in lays installed.
Window and Door Cut Outs (See Detail #05) - Use the provided Prazi beam cutter to cut your window and door openings. Lay
out the openings on the erected panels and chalk lines. - Once the opening is cut use your hot knife to rout out 1 5/8″ of foam around the whole opening.
- Apply a bead of foam before installing 2x inlays in the openings. Gently tap the 2x’s in place. Concussion will collapse the expandable foam.
Roof Panel Installation
- Calculate how much of your roof panel will hang past your wall panel to create your overhang. Make sure to measure from the face of the installed wall panels. Use this number to determine how much of your roof panel will be on the timber frame. Once you have this measurement you will chalk a line across the timber rafters.
- Apply a 2×4 to the timber rafters on this line. You will use this 2x to pull the roof panel into place. Screw the roof panel every 8″ on center wherever it meets a timber rafter. Remove the 2×4 once the first course is installed.
- Any cuts necessary to accomplish eave and rake details should be made to the panel before it is installed. This includes routing for sub fascia.
- Fasteners should be started in the panel before it is hoisted onto the roof.
- Continue installing the rest of your roof panels. Make sure to stagger the butt
joints. - Roof panels with sheetrock will be installed tight to one another with splines on both sides. Panels installed over boards can be spaced 3/8″ and top splined. The 3/8″ voids will be filled with foam once the roof installation is finished.
- Your peak panels will be ripped on a bevel. Make sure to leave a 3/8″ gap at the ridge for foaming. You will fill this void when you foam the roof. (See Detail #06)
- Peak panels should be wider than 2′. If your width is less than 2′ you should install the skinny piece before you get to the ridge. Reference your panel plan for roof layout.
- Roof Panels should be foamed immediately after installation is complete.
Roof Foaming
- Drill holes every 6-8″ if necessary.
- If it is 40 degrees or less outside we recommend water misting the foam as it is applied. This will help the foam expand properly.
Wall Foaming
- Wall foaming should not be done until all electrical work is complete. All window and door cuts out should be done with inlays applied. Windows and doors should be installed after foaming is complete.
- Chalk lines on the outside of the building where the electrical chases are. This is done so that you do not drill into the wiring.
- Drill holes every 8″-10″ at your panel joints from the outside of the building. Attach a piece of tape to the drill bit to set the proper depth to reach the foam channel.
- Start foaming from the top and work your way down. 1-2 seconds per hole usually works or until you can see foam at the next hole.
- If it is 40 degrees or less outside we recommend water misting the foam as it is applied. This will help the foam expand properly.